C++ IDE 有很多,比较著名的有 JetBrains Clion,Visual Studio(MSVC),Code::Blocks,Dev-C++。
但是这些 IDE 要么更新缓慢甚至停更(我说的就是你,Dev-C++),要么体量过大不适合竞赛编程(再次吐槽 JetBrains,一下给我吃掉 10GB 硬盘)。
而 Visual Studio Code 有两点好处,一是足够轻量(支持单文件编译,启动速度 <2s),二是支持数以万计的拓展,因此我们选择 VSCode 作为开发环境。
安装软件
我们需要安装以下几个软件:
- TDM-GCC
- LLVM Clang
- Visual Studio Code 本体、各种拓展
- Competitive Companion 浏览器拓展
TDM-GCC
访问 Download | tdm-gcc,选择 tdm64-gcc-10.3.0-2.exe,下载完毕后打开进行安装。
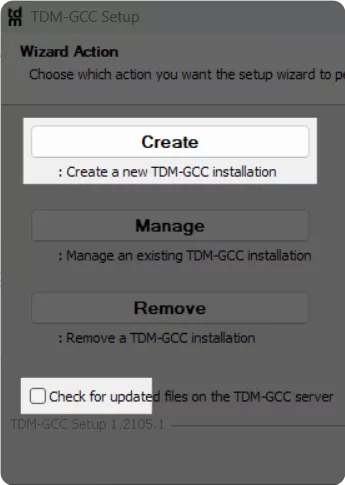
在第一界面取消勾选 Check for updated files on the TDM-GCC server,然后点击 Create 开始安装。

在 Installation Directory 处填入 C:\TDM-GCC-64,随后一直无脑下一步即可。
LLVM Clang
访问 Release LLVM Latest · llvm/llvm-project,选择 LLVM-xx.x.x-win64.exe 进行下载。
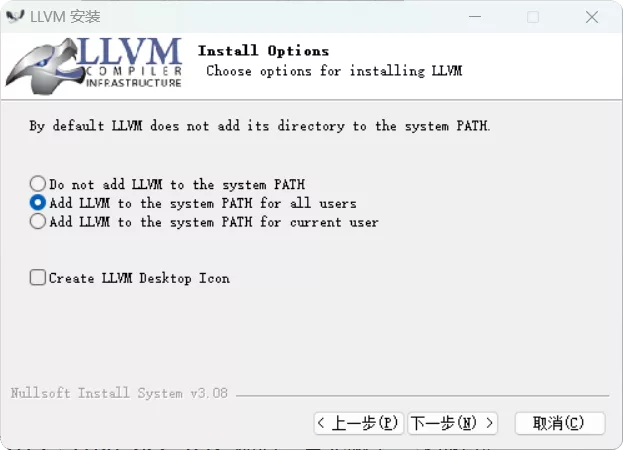
注意在 Install Options 界面,选择 Add LLVM to the System PATH for all users。

其他选项保持默认,点下一步即可。
Visual Studio Code
访问 Visual Studio Code - Code Editing. Redefined,选择 Download for Windows,下载安装包并安装。
至于是否添加 Code 到 PATH,看个人喜好。如果你想要在终端使用 code . 用 VSCode 打开当前文件夹的话请勾选。
VSCode 安装好后,我们在侧栏选择拓展,安装以下必选拓展:
- Better C++ Syntax(
jeff-hykin.better-cpp-syntax) - C/C++(
ms-vscode.cpptools) - Chinese (Simplified) (简体中文) Language Pack(
MS-CEINTL.vscode-language-pack-zh-hans) - Clang-Format(
xaver.clang-format) - clangd(
llvm-vs-code-extensions.vscode-clangd) - CMake(
twxs.cmake) - Competitive Programming Helper(
DivyanshuAgrawal.competitive-programming-helper) - Console Pauser(
Guyutongxue.pause-console) - Error Lens(
usernamehw.errorlens)
至于主题、文件图标看个人喜好,我选用的是 One Dark Pro 和 Material Icon Theme。
Competitive Companion
访问 Competitive Companion - Chrome 应用商店 安装即可。
配置
配置 VSCode C++
在你的硬盘上新建一个文件夹,作为你的 工作目录,之后的所有操作(包括写题)均在这个文件夹下。
在工作目录下新建 .vscode 文件夹,写入以下几个文件:
1. c_cpp_properties.json
{
  "configurations": [
    {
      "compilerPath": "C:\\TDM-GCC-64\\bin\\g++.exe",
      "cppStandard": "c++14",
      "includePath": [
        "${{workspaceFolder}}/**"
      ],
      "intelliSenseMode": "windows-gcc-x64",
      "name": "Win32"
    }
  ],
  "version": 4
}2. launch.json
{
  "configurations": [
    {
      "MIMode": "gdb",
      "args": [],
      "cwd": "${fileDirname}",
      "env": {
        "PATH": "C:\\TDM-GCC-64\\bin;${env:PATH}"
      },
      "environment": [],
      "externalConsole": true,
      "internalConsosleOptions": "neverOpen",
      "miDebuggerPath": "C:\\TDM-GCC-64\\bin\\gdb.exe",
      "name": "Single File Debug",
      "preLaunchTask": "Single File Build (Debug)",
      "program": "${fileDirname}\\${fileBasenameNoExtension}.exe",
      "request": "launch",
      "setupCommands": [
        {
          "description": "Enable pretty-printing for gdb",
          "ignoreFailures": true,
          "text": "-enable-pretty-printing",
        }
      ],
      "stopAtEntry": false,
      "type": "cppdbg"
    }
  ],
  "version": "0.2.0"
}3. settings.json
{
    "cph.general.defaultLanguage": "cpp",
    "cph.general.defaultLanguageTemplateFileLocation": ".../template.cpp",    // 这是你的模板文件路径
    "cph.general.firstTime": false,
    "cph.language.cpp.SubmissionCompiler": "GNU G++14 6.4.0",   // 使用 C++14 标准
    "cph.language.cpp.Args": "-std=c++14 -O2",
    "C_Cpp.default.compilerPath": "C:\\TDM-GCC-64\\bin\\g++.exe",
    "C_Cpp.default.intelliSenseMode": "windows-gcc-x64",
    "C_Cpp.codeAnalysis.runAutomatically": true,
    "errorLens.enabledDiagnosticLevels": [
        "error",
        "warning",
        "info",
        "hint"
    ],
    "search.useIgnoreFiles": false,
}注意在第 2 行填入你的缺省源文件路径
4. tasks.json
{
  "options": {
    "env": {
      "Path": "C:\\TDM-GCC-64\\bin;${env:Path}"
    }
  },
  "tasks": [
    {
      "args": [
        "${file}",
        "-o",
        "${fileDirname}\\${fileBasenameNoExtension}.exe",
        "-std=c++14",
        "-Wall",
        "-Wextra",
        "-O2",
        "-static-libgcc",
        "-static-libstdc++",
        "-Wl,-stack=134217728"
      ],
      "command": "C:\\TDM-GCC-64\\bin\\g++.exe",
      "group": {
        "isDefault": true,
        "kind": "build"
      },
      "label": "Single File Build",
      "presentation": {
        "clear": true,
        "echo": false,
        "focus": false,
        "panel": "shared",
        "reveal": "silent",
        "showReuseMessage": false
      },
      "problemMatcher": "$gcc",
      "type": "process"
    },
    {
      "args": [
        "-g",
        "${file}",
        "-o",
        "${fileDirname}\\${fileBasenameNoExtension}.exe",
        "-std=c++14",
        "-Wall",
        "-Wextra",
        "-static-libgcc",
        "-static-libstdc++",
        "-Wl,-stack=134217728"
      ],
      "command": "C:\\TDM-GCC-64\\bin\\g++.exe",
      "group": {
        "isDefault": true,
        "kind": "build"
      },
      "label": "Single File Build (Debug)",
      "presentation": {
        "clear": true,
        "echo": false,
        "focus": false,
        "panel": "shared",
        "reveal": "silent",
        "showReuseMessage": false
      },
      "problemMatcher": "$gcc",
      "type": "process"
    },
    {
      "args": [],
      "command": "${fileDirname}\\${fileBasenameNoExtension}.exe",
      "dependsOn": "Single File Build",
      "label": "Run & Pause",
      "options": {
        "cwd": "${fileDirname}",
        "env": {
          "Path": "C:\\TDM-GCC-64\\bin;${env:Path}"
        }
      },
      "presentation": {
        "clear": true,
        "echo": false,
        "focus": false,
        "panel": "shared",
        "reveal": "never",
        "showReuseMessage": false
      },
      "problemMatcher": [],
      "type": "pause-console"
    }
  ],
  "version": "2.0.0"
}配置 Clangd、Clang-Format 拓展
点击左下角打开设置,在搜索框搜索配置项并进行更改:
clangd.path:更改为C:\Program Files\LLVM\bin\clangd.execlang-format.executable:更改为C:\Program Files\LLVM\bin\clang-format.execlang-format.style:更改为file:C:\Users\<电脑用户文件夹>\.clang-formatC_Cpp.intelliSenseEngine:更改为disabled@lang:cpp editor.defaultFormatter:更改为Clang-Format
配置 Clangd Configuration
按 F1 键,输入 clangd: Open user configuration file,打开 clangd 的 config.yaml,填入以下内容:
CompileFlags:
  Add:
    - "-target"
    - "x86_64-pc-windows-gnu"
    - "--gcc-toolchain=C:/TDM-GCC-64"
    - "-stdlib=libstdc++"
    - "-Wall"
    - "-Wextra"
    - "-std=c++14"
    - "-IC:/TDM-GCC-64/include"
    - "-LC:/TDM-GCC-64/lib"
    - "-static"
    - "-Wno-deprecated-declarations"
  Compiler: g++

Diagnostics:
  UnusedIncludes: None
  MissingIncludes: Strict

InlayHints:
  Enabled: true
  ParameterNames: true
  DeducedTypes: true
  Designators: true

Completion:
  AllScopes: true
配置 Clang-Format Configuration
在 C:\Users\<电脑用户文件夹>\ 下新建一个文件 .clang-format,填入以下内容:
BasedOnStyle: Google
IndentWidth: 4
ColumnLimit: 100
AllowShortBlocksOnASingleLine: Never    # 禁止代码块在单行显示
SortIncludes: Never     # 保持 include 顺序不变
MaxEmptyLinesToKeep: 1 # 最多保留1个空行测试环境
在工作目录下新建 hello.cpp,写一段 Hello World 程序。
然后你就可以发现 Clangd 为 C++ 提供了:
- 完整的补全
- 动态语法分析、错误检查(未定义、未使用、作用域错误、隐式类型转换,基于 Clang-tidy)
- 实时自动 #include(这个程序里的所有 include 都是 clangd 自动添加的,只需要按一下 Tab 即可)
- 函数参数名提示
- 类型提示(如
auto关键字自动推算类型) - ……
如果需要格式化代码,只需要按 Shift+Alt+F。
如果需要常规运行,只需要按 F6,如果需要调试,设置好端点后可按 F5 开始调试。
Competitive Programming Helper & Competitive Companion
在浏览器打开一道题,点击拓展栏 Competitive Companion 的图表,会发现样例等内容已经自动传输到了 VSCode,可以直接测试。
Why Clangd?
在上面的配置步骤中你可能发现我故意将微软 C/C++ 拓展的 Intellisence 引擎关闭了,那为什么使用 Clangd 而不是 Cpptools(微软 C/C++ 提供的引擎)?
首先,Clangd 能提供更多的功能,比如自动添加头文件、精确重命名符号、类型提示等,而这些是 Cpptools 没有的。
其次,Cpptools 延迟太高,有的时候打完代码要等大约 1~2 秒才能让 Intellisence 引擎反应过来,而 Clangd 的延迟基本能控制在 0.5 秒以内。
最后就是,用过 Cpptools 的,看一下 "%USERPROFILE%\AppData\Local\Microsoft\vscode-cpptools" 占了多少空间?基本上写上十几个题就能达到 3~5 GB,这些缓存还没有提示,用着用着 C 盘就满了。
Clang 同时也是 JetBrains Clion 的标配引擎。